防火墙安全策略(华为手册)
实验的目的
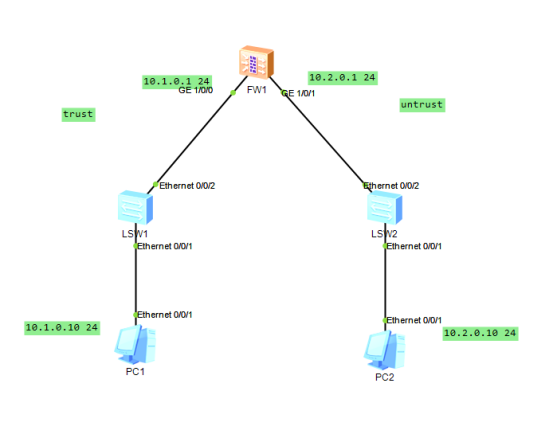
配置如下
1
2
3
4
5
6
| interface GigabitEthernet1/0/0
undo shutdown
ip address 10.1.0.1 255.255.255.0
interface GigabitEthernet1/0/1
undo shutdown
ip address 10.2.0.1 255.255.255.0
|
配置好pc 的ip地址和防火墙的ip地址
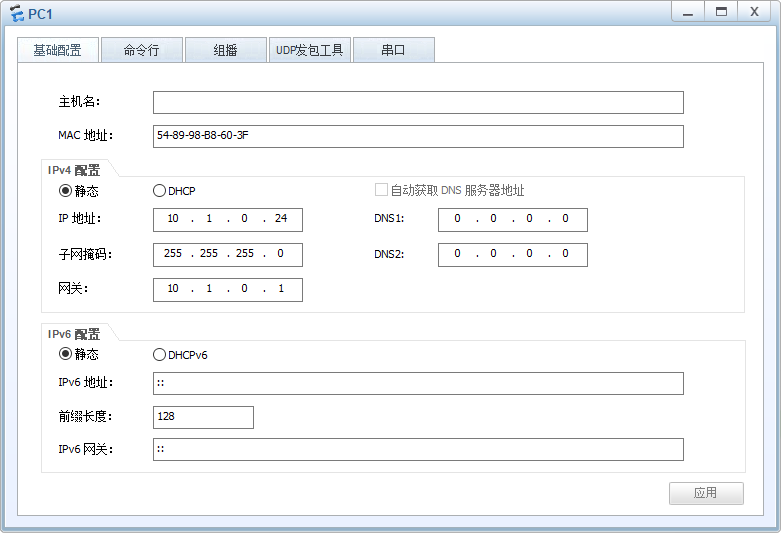
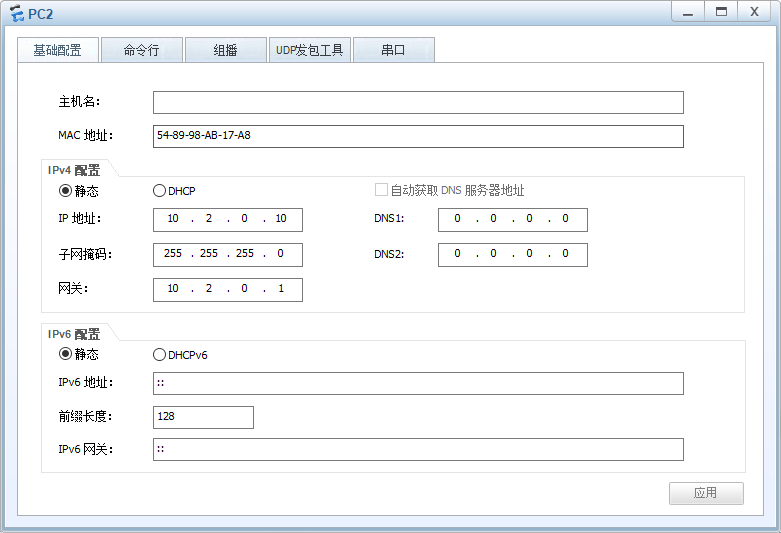
防火墙的策略如下
1
2
3
4
5
6
7
8
9
10
11
12
13
14
15
16
17
18
19
20
21
22
|
firewall zone trust
set priority 85
add interface GigabitEthernet0/0/0
add interface GigabitEthernet1/0/0
firewall zone untrust
set priority 5
add interface GigabitEthernet1/0/1
[USG6000V1-policy-security]di th
2026-04-29 00:35:19.030
security-policy
rule name policy_sec
source-zone trust
destination-zone untrust
action permit
return
[USG6000V1-policy-security]
|
现在需要将pc1和pc2加入到同一个vlan里面
1
2
3
4
5
6
7
8
9
10
11
12
13
14
15
16
17
18
19
20
21
22
23
24
25
26
27
28
29
30
31
32
33
34
35
36
37
|
vlan 10
[Huawei-Ethernet0/0/1]di th
interface Ethernet0/0/1
port link-type access
port default vlan 10
return
[Huawei-Ethernet0/0/2]di th
interface Ethernet0/0/2
port link-type access
port default vlan 10
return
[Huawei-Ethernet0/0/2]
vlan 10
[Huawei-Ethernet0/0/1]di th
interface Ethernet0/0/1
port link-type access
port default vlan 10
return
[Huawei-Ethernet0/0/2]di th
interface Ethernet0/0/2
port link-type access
port trunk default vlan 10
return
[Huawei-Ethernet0/0/2]
|
接下来使用pc1 ping pc2
可以发现是ping不通的
因为我们只是允许了trust区域去untrust区域,但是untrust区域是去不了trust区域的
我们可以查看一下,我们自己配置的防火墙规则
1
2
3
4
5
6
7
8
9
10
11
12
13
14
15
16
| [USG6000V1-policy-security]dis security-policy rule all
2026-04-29 00:54:20.140
Total:2
RULE ID RULE NAME STATE ACTION HITS
1 policy_sec enable permit 0
0 default enable deny 0
[USG6000V1-policy-security]dis security-policy rule name policy_sec
2026-04-29 00:54:37.120
(0 times matched)
rule name policy_sec
source-zone trust
destination-zone untrust
action permit
[USG6000V1-policy-security]
|
可以看到确实是
接下来增加策略
1
2
3
4
5
6
7
8
9
10
| [USG6000V1-policy-security-rule-untrust_to_trust]di th
2026-04-29 00:56:22.960
#
rule name untrust_to_trust
source-zone untrust
destination-zone trust
action permit
#
return
[USG6000V1-policy-security-rule-untrust_to_trust]
|
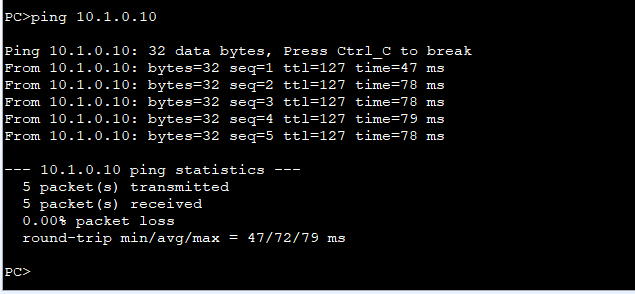
接下来就可以ping通了
防火墙安全策略(作业包含net配置)
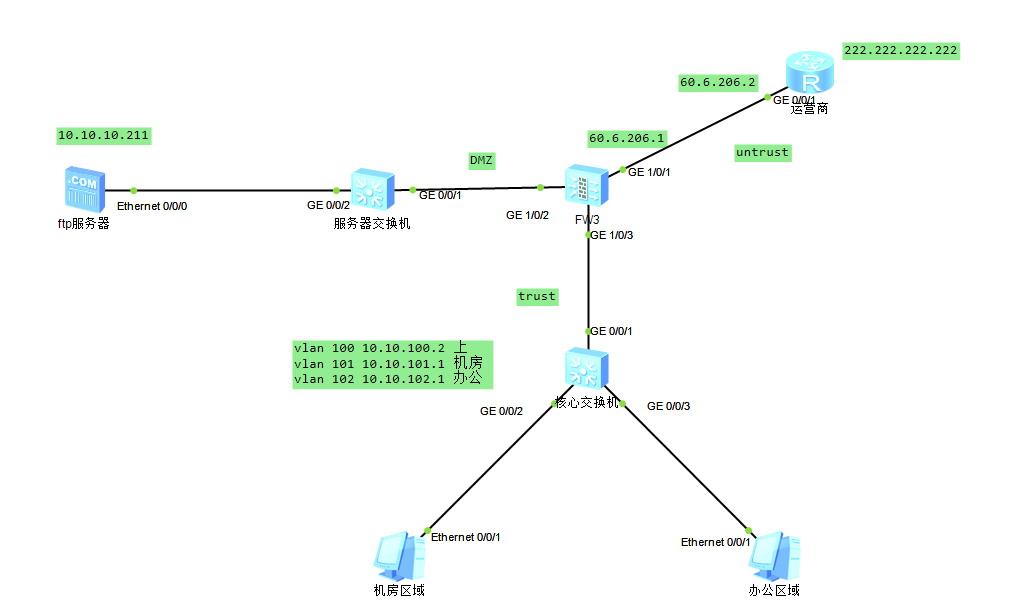
实验目的
1
2
3
4
5
6
7
8
9
10
11
12
13
14
15
16
17
18
19
20
21
22
23
24
25
26
| 主要目标:
1、实现全网互通
运营商:配置地址即可
服务器交换机:傻瓜,不配置
FTP服务器:配置,启服务
核心交换机:创VLAN
调端口
给路由
防火墙:配置地址
配安全策略:
内到外
DMZ到外
内到DMZ
调接口安全区域
给路由
做地址转化
2、实现防火墙可内网管理
启动服务(telnet web SSH)
创用户,并给定用户权限
配置安全策略
trust到local
3、实现FTP服务器外网可访问
NAT端口映射
放行NAT服务
|
运营商,ftp,核心交换机的配置
1
2
3
4
5
6
7
8
9
10
11
12
13
14
15
16
17
18
19
20
21
22
23
24
25
26
27
28
| 相关配置
1、全网互通
运营商:
interface GigabitEthernet0/0/1
ip address 60.6.206.2 255.255.255.0
interface LoopBack0
ip address 222.222.222.222 255.255.255.255
FTP服务器:
配置 10.10.10.211 网关10.10.10.1
启动FTP并配置目录
核心交换机:
vlan batch 100 to 102
interface Vlanif100
ip address 10.10.100.2 255.255.255.0
interface Vlanif101
ip address 10.10.101.1 255.255.255.0
interface Vlanif102
ip address 10.10.102.1 255.255.255.0
interface GigabitEthernet0/0/1
port link-type access
port default vlan 100
interface GigabitEthernet0/0/2
port link-type access
port default vlan 101
interface GigabitEthernet0/0/3
port link-type access
port default vlan 102
ip route-static 0.0.0.0 0.0.0.0 10.10.100.1
|
防火墙配置
1
2
3
4
5
6
7
8
9
10
11
12
13
14
15
16
17
18
19
20
21
22
23
24
25
26
27
28
29
30
31
32
33
34
35
36
37
38
39
| 防火墙:
interface GigabitEthernet1/0/1
undo shutdown
ip address 60.6.206.1 255.255.255.0
interface GigabitEthernet1/0/2
undo shutdown
ip address 10.10.10.1 255.255.255.0
interface GigabitEthernet1/0/3
undo shutdown
ip address 10.10.100.1 255.255.255.0
firewall zone trust
add interface GigabitEthernet1/0/3
firewall zone untrust
add interface GigabitEthernet1/0/1
firewall zone dmz
add interface GigabitEthernet1/0/2
security-policy
rule name trust_untrust
source-zone trust
destination-zone untrust
action permit
rule name dmz_untrust
source-zone dmz
destination-zone untrust
action permit
rule name trust_dmz
source-zone trust
destination-zone dmz
action permit
ip route-static 0.0.0.0 0.0.0.0 60.6.206.2
ip route-static 10.10.0.0 255.255.0.0 10.10.100.2
nat address-group pool_nat 0
mode pat
section 0 60.6.206.3 60.6.206.4
nat-policy
rule name inside_outside
source-zone trust
destination-zone untrust
action source-nat address-group pool_nat
|
防火墙的ssh配置
1
2
3
4
5
6
7
8
9
10
11
12
13
14
15
16
17
18
19
20
21
22
23
24
25
26
27
| SSH配置:
1、启动服务
stelnet server enable
2、建用户,并授权
aaa
manager-user lisi
password cipher 12345678
service-type ssh
level 15
ssh user lisi
ssh user lisi authentication-type password
ssh user lisi service-type stelnet
3、进用户接口配置SSH授权
interface GigabitEthernet 1/0/3
service-manage enable
service-manage ssh permit
4、安全规则允许
security-policy
rule name ssh_access_from_trust
source-zone trust
destination-zone local
action permit
5、产生公钥
rsa local-key-pair create
6 检查服务状态
display ssh server status
display rsa local-key-pair public
|
最后发现ssh连接不上
防火墙net配置(华为手册)
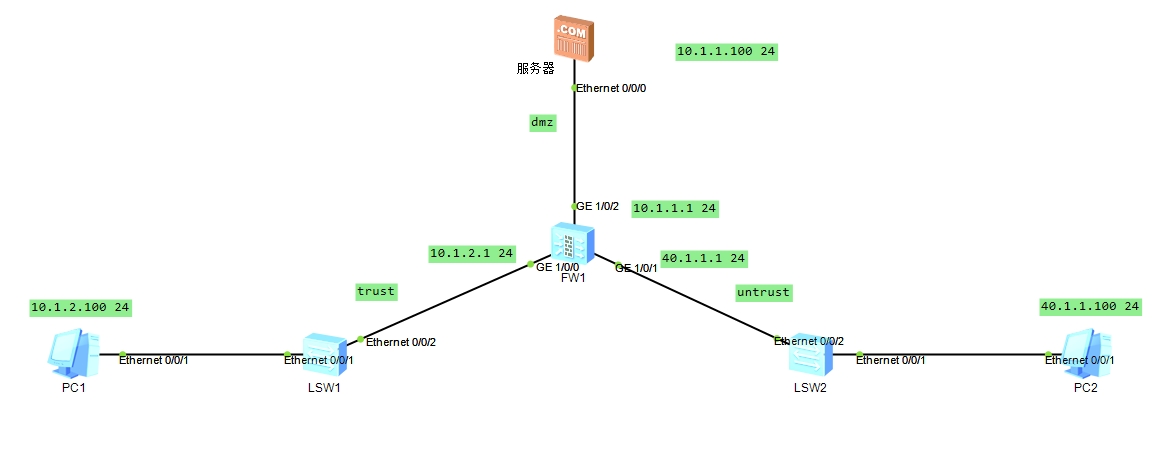
拓扑图如上
开始配置
服务器
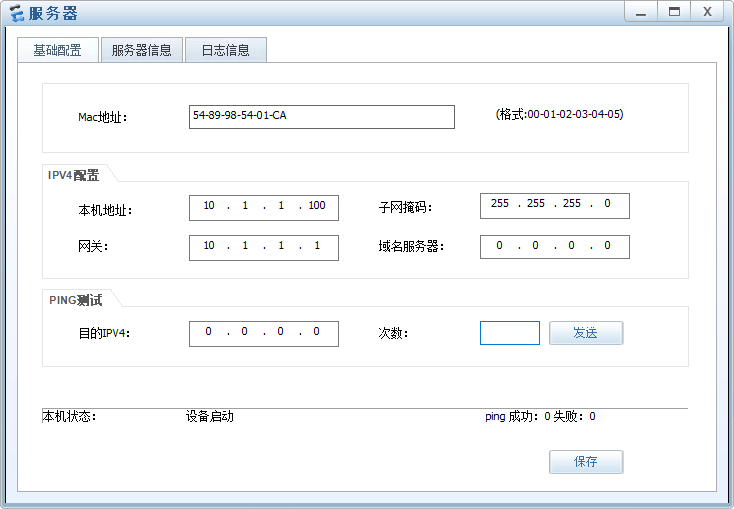
两个交换机是傻瓜交换机
防火墙配置
1
2
3
4
5
6
7
8
9
10
11
12
13
14
15
16
17
18
19
20
21
22
23
24
25
26
27
28
29
30
31
| interface GigabitEthernet1/0/0
undo shutdown
ip address 10.1.2.1 255.255.255.0
interface GigabitEthernet1/0/1
undo shutdown
ip address 40.1.1.1 255.255.255.0
interface GigabitEthernet1/0/2
undo shutdown
ip address 10.1.1.1 255.255.255.0
firewall zone trust
set priority 85
add interface GigabitEthernet0/0/0
add interface GigabitEthernet1/0/0
firewall zone untrust
set priority 5
add interface GigabitEthernet1/0/1
firewall zone dmz
set priority 50
add interface GigabitEthernet1/0/2
nat address-group natpool 0
mode pat
section 0 2.2.2.2 2.2.2.5
nat-policy
rule name source_nat
source-zone trust
destination-zone untrust
action source-nat address-group natpool
|
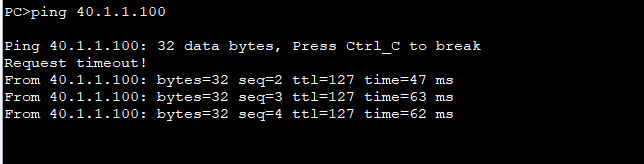
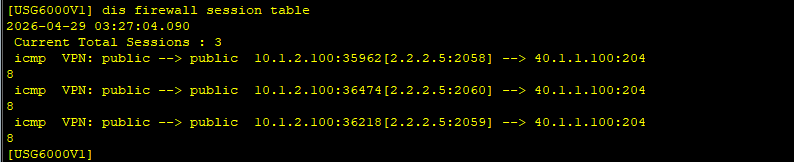
可以看到net地址转化生效
防火墙双机热备实验(华为手册)
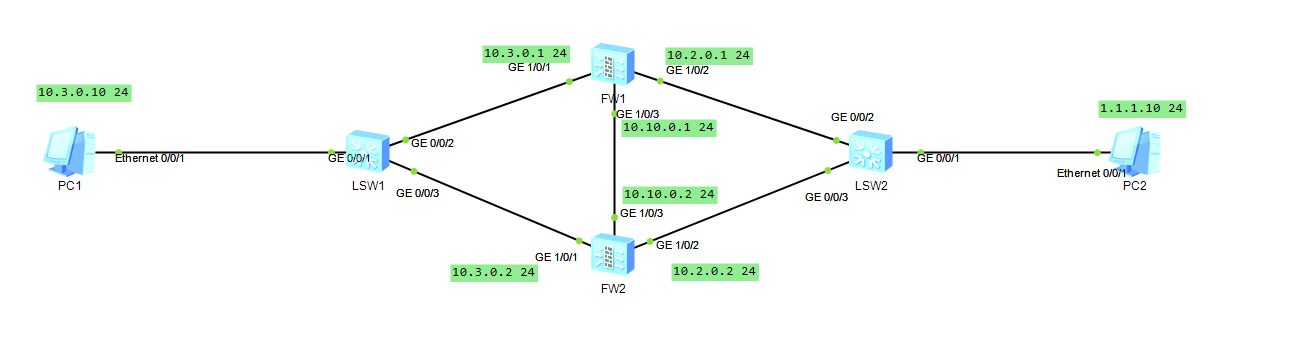
拓扑如上,式样要求是左边是trust右边是untrust,中间是dmz
两个防火墙实现双击热备
先配置FW1的1/0/1 和1/0/2
1
2
3
4
5
6
7
| interface GigabitEthernet1/0/1
undo shutdown
ip address 10.3.0.1 255.255.255.0
interface GigabitEthernet1/0/2
undo shutdown
ip address 10.2.0.1 255.255.255.0
|
还是对FW1进行配置
将G1/0/1配置vrrp备份组1,并加入到状态为active的VGMP
将G1/0/2配置vrrp备份组2,并加入到状态为active的VGMP
1
2
3
4
5
6
7
8
9
| interface GigabitEthernet1/0/1
undo shutdown
ip address 10.3.0.1 255.255.255.0
vrrp vrid 1 virtual-ip 10.3.0.3 active
interface GigabitEthernet1/0/2
undo shutdown
ip address 10.2.0.1 255.255.255.0
vrrp vrid 2 virtual-ip 1.1.1.1 255.255.255.0 active
|
还是对FW配置
将左右接口加入对应的区域
1
2
3
4
5
6
7
8
| firewall zone trust
set priority 85
add interface GigabitEthernet0/0/0
add interface GigabitEthernet1/0/1
#
firewall zone untrust
set priority 5
add interface GigabitEthernet1/0/2
|
然后现在就开始配置FW2了
配置FW2的IP地址
1
2
3
4
5
6
7
| interface GigabitEthernet1/0/1
undo shutdown
ip address 10.3.0.2 255.255.255.0
interface GigabitEthernet1/0/2
undo shutdown
ip address 10.2.0.2 255.255.255.0
|
将FW2的1/0/1和1/0/2vrrp备份组1和备份组2,并都加入状态为standby的VGMP管理组
1
2
3
4
5
6
7
8
9
| interface GigabitEthernet1/0/1
undo shutdown
ip address 10.3.0.2 255.255.255.0
vrrp vrid 1 virtual-ip 10.3.0.3 standby
interface GigabitEthernet1/0/2
undo shutdown
ip address 10.2.0.2 255.255.255.0
vrrp vrid 2 virtual-ip 1.1.1.1 255.255.255.0 standby
|
然后将左右接口加入到对应的区域
1
2
3
4
5
6
7
| firewall zone trust
set priority 85
add interface GigabitEthernet0/0/0
add interface GigabitEthernet1/0/1
firewall zone untrust
set priority 5
add interface GigabitEthernet1/0/2
|
现在已经完成了防火墙的基本配置了,现在开始设置心跳线
配置这两个防火墙的ip地址
1
2
3
4
5
6
7
8
| FW1
interface GigabitEthernet1/0/3
undo shutdown
ip address 10.10.0.1 255.255.255.0
FW2
interface GigabitEthernet1/0/3
undo shutdown
ip address 10.10.0.2 255.255.255.0
|
然后都加入dmz区域
1
2
3
4
5
6
7
8
| FW1
firewall zone dmz
set priority 50
add interface GigabitEthernet1/0/3
FW2
firewall zone dmz
set priority 50
add interface GigabitEthernet1/0/3
|
然后开启双击热备功能
1
2
3
4
5
6
| FW1
hrp enable
hrp interface GigabitEthernet1/0/3 remote 10.10.0.2
FW2
hrp enable
hrp interface GigabitEthernet1/0/3 remote 10.10.0.1
|
最后设置策略
1
2
3
4
5
6
| security-policy
rule name trust_to_untrust
source-zone trust
destination-zone untrust
source-address 10.3.0.0 mask 255.255.255.0
action permit
|
开始配置FW1的NAT策略,双机热备建立之后,FW1的NAT策略配置会自动备份到FW2上面
配置的策略思路如下
将源地址10.3.0.0 24转化为1.1.1.2到1.1.1.5
1
2
3
4
5
6
7
8
9
| nat address-group group1 0
mode pat
section 0 1.1.1.2 1.1.1.5
nat-policy
rule name policy_nat1
source-zone trust
destination-zone untrust
source-address 10.3.0.0 mask 255.255.255.0
action source-nat address-group group1
|
最后直接ping
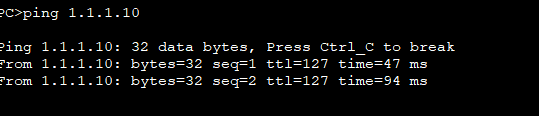
防火墙ipsec vpn配置实验
拓扑图如下
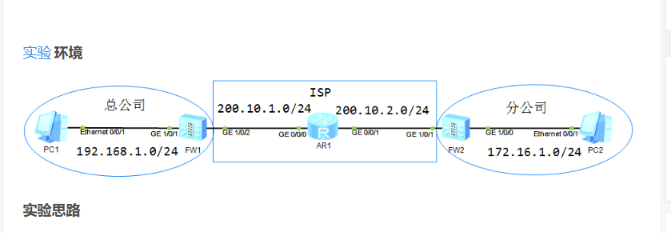
首先配置pc的ip地址
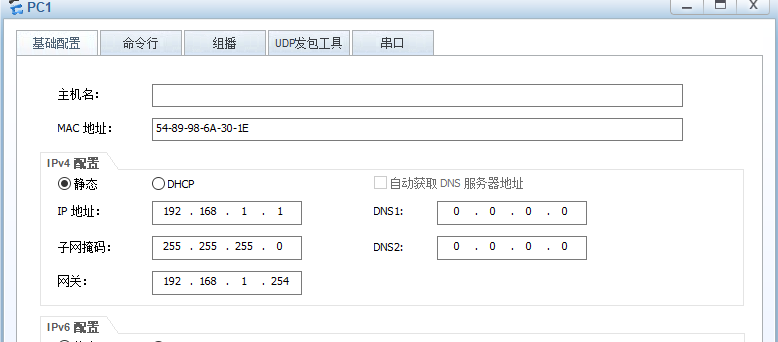
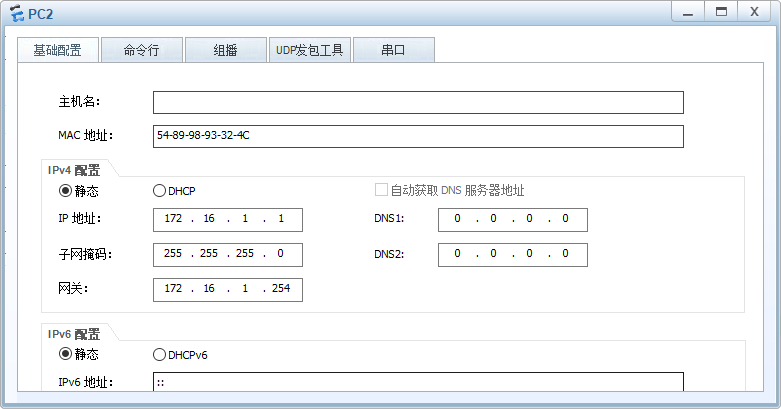
配置fw1的ip地址
1
2
3
4
5
6
7
| interface GigabitEthernet1/0/1
undo shutdown
ip address 192.168.1.254 255.255.255.0
interface GigabitEthernet1/0/2
undo shutdown
ip address 200.10.1.1 255.255.255.0
|
配置FW2的ip地址
1
2
3
4
5
6
7
| interface GigabitEthernet1/0/0
undo shutdown
ip address 172.16.1.254 255.255.255.0
interface GigabitEthernet1/0/1
undo shutdown
ip address 200.10.2.3 255.255.255.0
|
配置R1的IP地址
1
2
3
4
5
| interface GigabitEthernet0/0/0
ip address 200.10.1.2 255.255.255.0
interface GigabitEthernet0/0/1
ip address 200.10.2.2 255.255.255.0
|
给FW1划分区域
1
2
3
4
5
6
7
8
| firewall zone trust
set priority 85
add interface GigabitEthernet0/0/0
add interface GigabitEthernet1/0/1
#
firewall zone untrust
set priority 5
add interface GigabitEthernet1/0/2
|
给FW2划分区域
1
2
3
4
5
6
7
8
| firewall zone trust
set priority 85
add interface GigabitEthernet0/0/0
add interface GigabitEthernet1/0/0
#
firewall zone untrust
set priority 5
add interface GigabitEthernet1/0/1
|
FW1配置ospf协议
1
2
3
4
| ospf 1
area 0.0.0.0
interface GigabitEthernet1/0/2
ospf enable 1 area 0.0.0.0
|
R1配置ospf协议
1
2
3
4
5
6
| ospf 1
area 0.0.0.0
interface GigabitEthernet0/0/0
ospf enable 1 area 0.0.0.0
interface GigabitEthernet0/0/1
ospf enable 1 area 0.0.0.0
|
FW2配置ospf协议
1
2
3
4
| ospf 1
area 0.0.0.0
interface GigabitEthernet1/0/1
ospf enable 1 area 0.0.0.0
|
于是现在开始配置VPN了
对FW1配置acl
1
2
3
4
5
6
| [FW1]dis acl 3000
2026-05-11 12:15:37.580
Advanced ACL 3000, 1 rule ( Reference counter 0 )
Acl's step is 5
rule 5 permit ip source 192.168.1.0 0.0.0.255 destination 172.16.1.0 0.0.0.255
(0 times matched)
|
对FW1配置ike安全提议
[FW1]ike proposal 1
[FW1-ike-proposal-1]di th
1
2
3
4
5
6
7
8
9
10
11
12
| 2026-05-11 12:16:27.310
#
ike proposal 1
encryption-algorithm aes-256
dh group14
authentication-algorithm sha2-256
authentication-method pre-share
integrity-algorithm hmac-sha2-256
prf hmac-sha2-256
#
return
// 验证与加密算法使用默认配置
|
对FW1配置ike对等体
1
2
3
4
| [FW1]ike peer FW2
[FW1-ike-peer-FW2]pre-shared-key huawei
[FW1-ike-peer-FW2]ike-proposal 1
[FW1-ike-peer-FW2]remote-address 200.10.2.3
|
对FW1配置ipsec安全提议
1
2
3
4
5
6
7
8
9
10
| [FW1]ipsec proposal 2
[FW1-ipsec-proposal-2]di th
2026-05-11 12:20:45.230
#
ipsec proposal 2
esp authentication-algorithm sha2-256
esp encryption-algorithm aes-256
#
return
|
对FW1配置ipsec策略
1
2
3
4
| [FW1]ipsec policy runtime 10 isakmp
[FW1-ipsec-policy-isakmp-runtime-10]security acl 3000
[FW1-ipsec-policy-isakmp-runtime-10]ike-peer FW2
[FW1-ipsec-policy-isakmp-runtime-10]proposal 2
|
对FW1绑定ipsec接口
1
| [FW1-GigabitEthernet1/0/2]ipsec policy runtime
|
对FW1的静态配置路由
1
| [FW1]ip route-static 172.16.1.0 24 200.10.1.2
|
对FW2配置acl
1
2
3
4
5
6
7
| [FW2-acl-adv-3000]di th
2026-05-11 12:31:20.810
#
acl number 3000
rule 5 permit ip source 172.16.1.0 0.0.0.255 destination 192.168.1.0 0.0.0.255
#
return
|
对FW2配置ike安全提议
1
2
3
4
5
6
7
8
9
10
11
12
13
14
| [FW2]ike proposal 1
[FW2-ike-proposal-1]di th
2026-05-11 12:32:11.620
#
ike proposal 1
encryption-algorithm aes-256
dh group14
authentication-algorithm sha2-256
authentication-method pre-share
integrity-algorithm hmac-sha2-256
prf hmac-sha2-256
#
return
// 这里使用默认的加密方式
|
对FW2配置ike对等体
1
2
3
4
| [FW2]ike peer FW1
[FW2-ike-peer-FW1]pre-shared-key huawei
[FW2-ike-peer-FW1]ike-proposal 1
[FW2-ike-peer-FW1]remote-address 200.10.1.1
|
对FW2配置ipsec安全提议
1
2
3
4
5
6
7
8
9
10
| [FW2]ipsec proposal 1
[FW2-ipsec-proposal-1]di th
2026-05-11 12:36:11.260
#
ipsec proposal 1
esp authentication-algorithm sha2-256
esp encryption-algorithm aes-256
#
return
|
对FW2配置ipsec策略
1
2
3
4
| [FW2]ipsec policy aaa 10 isakmp
[FW2-ipsec-policy-isakmp-aaa-10]security acl 3000
[FW2-ipsec-policy-isakmp-aaa-10]ike-peer FW1
[FW2-ipsec-policy-isakmp-aaa-10]proposal 1
|
对FW2绑定接口
1
| [FW2]ipsec policy aaa 10
|
对FW2配置静态路由
1
| [FW2]ip route-static 192.168.1.0 24 200.10.2.2
|
对FW1配置防火墙策略
1
2
3
4
5
6
7
8
9
10
11
12
13
14
15
16
17
18
19
20
21
22
23
24
25
26
27
28
29
30
31
32
33
34
35
36
37
38
39
40
41
42
43
| 对FW1配置安全策略
[FW1-policy-security]di th
2026-05-11 12:49:31.220
#
security-policy
rule name t_u
source-zone trust
destination-zone untrust
source-address 192.168.1.0 mask 255.255.255.0
destination-address 172.16.1.0 mask 255.255.255.0
service icmp
action permit
rule name u_l
source-zone untrust
destination-zone local
source-address 200.10.2.3 mask 255.255.255.255
destination-address 200.10.1.1 mask 255.255.255.255
service esp
action permit
#
return
[FW1]ip service-set isakmp type object 16
[FW1-object-service-set-isakmp]service protocol udp source-port 500
[FW1-policy-security-rule-isakmp]di th
2026-05-11 12:52:19.910
#
rule name isakmp
source-zone local
source-zone untrust
destination-zone local
destination-zone untrust
source-address 200.10.1.1 mask 255.255.255.255
source-address 200.10.2.3 mask 255.255.255.255
destination-address 200.10.1.1 mask 255.255.255.255
destination-address 200.10.2.3 mask 255.255.255.255
service isakmp
action permit
#
return
|
对FW2配置防火墙策略
1
2
3
4
5
6
7
8
9
10
11
12
13
14
15
16
17
18
19
20
21
22
23
24
25
26
27
28
29
30
31
32
33
34
35
36
37
38
39
40
41
42
43
44
45
46
47
48
49
50
51
52
53
54
55
56
57
| 对FW2配置防火墙策略
[FW2-policy-security-rule-t_u]di th
2026-05-11 12:55:18.990
#
rule name t_u
source-zone trust
source-zone untrust
destination-zone trust
source-address 192.168.1.0 mask 255.255.255.0
destination-address 172.16.1.0 mask 255.255.255.0
destination-address 192.168.1.0 mask 255.255.255.0
service icmp
action permit
#
return
[FW2-policy-security-rule-u_l]di th
2026-05-11 12:56:31.180
#
rule name u_l
source-zone untrust
destination-zone local
source-address 200.10.1.1 mask 255.255.255.255
destination-address 200.10.2.3 mask 255.255.255.255
service esp
action permit
#
return
[FW2-object-service-set-isakmp]di th
2026-05-11 12:57:18.150
#
ip service-set isakmp type object 16
service 0 protocol udp source-port 500
#
return
[FW2-policy-security-rule-isakmp]di th
2026-05-11 12:59:15.600
#
rule name isakmp
source-zone local
source-zone untrust
destination-zone local
destination-zone untrust
source-address 200.10.1.1 mask 255.255.255.255
source-address 200.10.2.3 mask 255.255.255.255
destination-address 200.10.1.1 mask 255.255.255.255
destination-address 200.10.2.3 mask 255.255.255.255
service isakmp
action permit
#
return
|
华为防火墙配置web服务管理
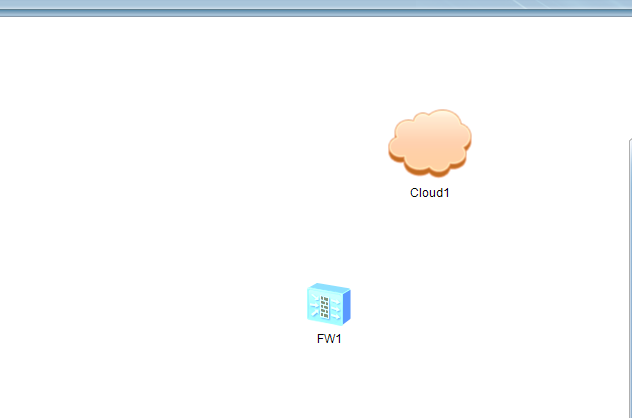
拓扑图直接这样,最终的效果如下
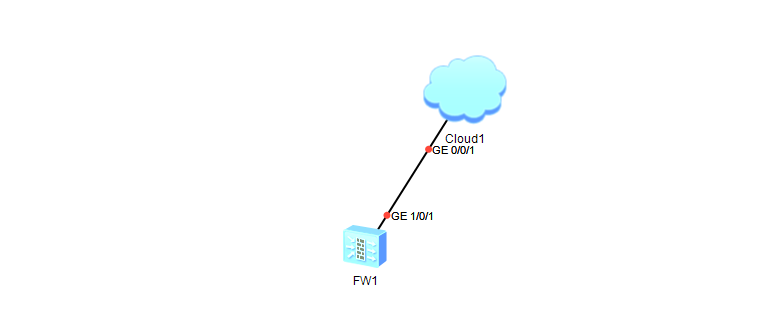
但是一开始,没有配置云朵的话,是不能使用线进行连接的
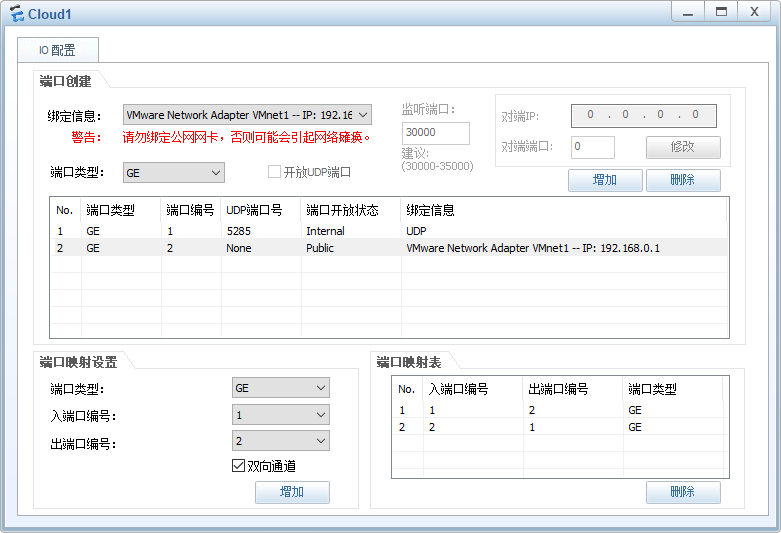
云朵的配置如上,其中使用的网卡,可以使用vmware里面的仅主机网卡
1
2
| [FW-GigabitEthernet1/0/1]service-manage http permit
[FW-GigabitEthernet1/0/1]ip address 192.168.0.100 24
|
配置好ip地址和开启http服务